
Free Spiderweb Crochet Pattern 🕸️ Easy Halloween Earrings, Pendant or Brooch
Looking for a quick and spooky project? 🕸️🕷️🕸️🕷️ This free spiderweb crochet pattern is perfect for creating Halloween earrings, pendants, or brooches or tiny decoration for your home. It’s beginner-friendly, works up fast, and is a fun way to make your own handmade accessories for the spooky season.
This pattern is part of my mini halloween collection. It pairs well with the HEDWIG halloween choker.

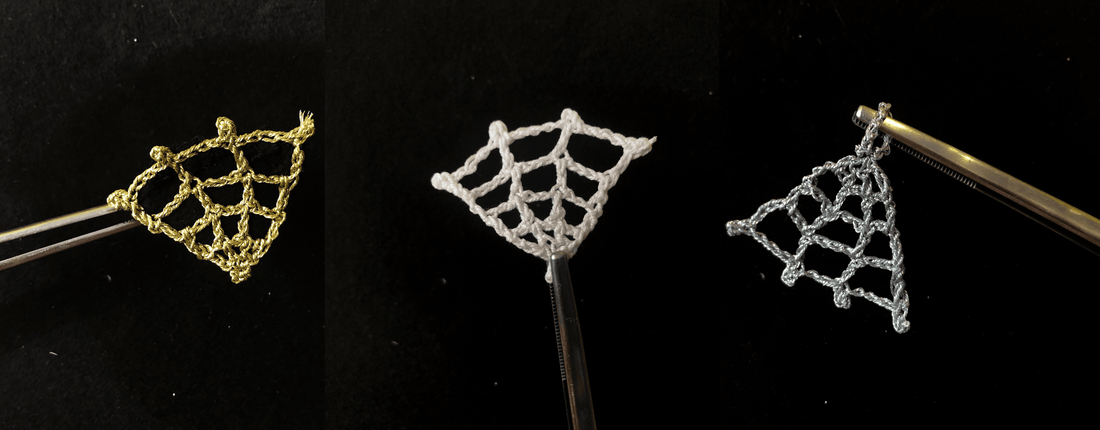
The spiderweb is available in two sizes, depending on your skill level choose your option. The lace weight version looks more like delicate jewelry.
Since this is a quick project you can start with the bigger version to practice, and after finishing one spiderweb, make more with the thin yarn.
You can find the detailed instructions below or the pattern as shorthand.
Yarn & Materials
-
Yarn options:
-
Fingering weight cotton yarn (recommended for beginners)
-
Lace weight cotton (for more advanced crocheters, this is very thin)
-
-
Finished sizes:
-
Fingering weight: 6 x 6 cm
-
Lace weight: 4 x 4 cm
-
-
Hook sizes:
-
2 mm (fingering weight)
-
1.25 mm (lace weight)
-
Suggested yarns
-
Fingering weight: DROPS Safran, or Hobbii Rainbow Cotton 8/4
-
Lace weight: YarnArt Lily or embroidery thread
Summary of construction:
- Row 1: create the little tabs
- Row 2-5: double crochets worked into the tabs, always stacking on top of the previous row
In the first row we create little tabs. In the next row you work your double crochets into the little tabs. In this pattern the double crochets are always on top of each other. This creates the vertical bars of the spiderweb. The last double crochet goes around the chains of the previous row.
Stitch glossary (US terminology)
| sl st | slip stitch |
| ch | chain |
| dc | double crochet |
| dc3tog | double crochet three together |
| [brackets] | what is inside [ ] brackets get's repeated |
Pattern (detailed)
ROW 1
Chain 3, turn, slip stitch into the next two stitches from the hook, chain 7, turn, slip stitch 2, chain 7, turn, slip stitch 2.
turn
ROW 2
chain 6, double crochet into the first tab, ch 3, dc into next tab, ch 3, dc into last tab.
turn
ROW 3
ch 5, dc into the first dc of the previous row, ch 2, dc into next dc, ch 2, dc into 3rd stitch.
turn
ROW 4
ch 4, dc, ch 1, dc, ch 1, dc into 2nd stitch.
turn
ROW 5
ch 3, double crochet three together, ch 3, turn, slip stitch into next two chains.
Fasten off and weave in ends.
Pattern as shorthand
ROW 1: ch 3, turn, sl st 2, [ch 7, turn, sl st 2] *3. turn
ROW 2: ch 6,[dc, ch 3]*2, dc. turn
ROW 3: ch 5,[dc, ch 2]*2, dc. turn
ROW 4: ch 4, [dc, ch 1]*2, dc. turn
ROW 5: ch 3, dc3tog, ch 3, turn, sl st 2.
Fasten off, weave in ends.
Blocking & Starching Your Crochet Spiderweb
To make your spiderwebs to hold their shape, you’ll need to starch them. You can do this using starch here is how:

-
Mix 1 tsp starch (corn, potato or wheat) with 2 tsp cold water.
-
Boil 1 cup of water, then pour into your starch mixture and stir until it looks gooey and transparent.
-
Soak your crochet spiderweb in the mixture.
-
Squeeze out excess starch, pin your spiderweb into shape (pull on tabs to open up the holes).
-
Let it dry completely.
-
If it's not stiff enough, repeat the starching process. 2-3 coats should be enough.
Alternatively you can stiffen your project using transparent nail polish or glue.
How to Use Your Crochet Spiderweb
This tiny crochet web can be turned into:
-
🎃 Halloween earrings
-
🕸️ Pendant or necklace charm
-
🕷️ Brooch or pin
-
👻 Charms for bags, hats, or costumes, keychain

Did you enjoy this pattern? If you did, please show me your finished projects!
Tag me as @lukrezia.atelier on Instagram or Tiktok, or upload your project to Ravelry and leave feedback! 🕷️ Here you find all the links to my accounts.